
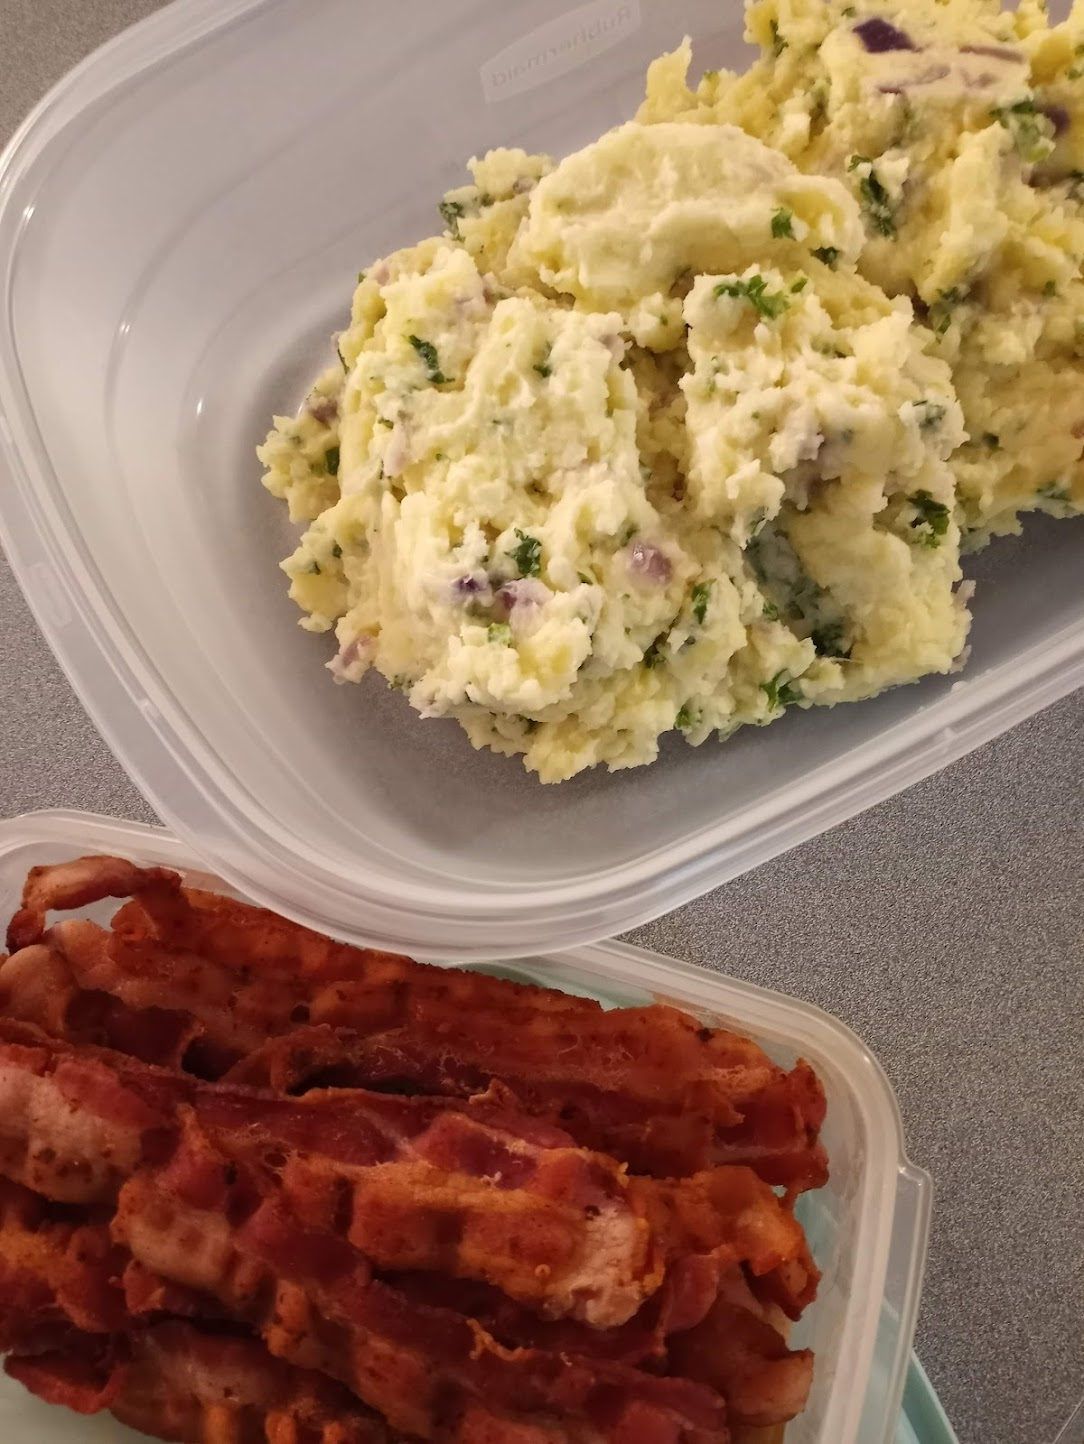
Colcannon, submitted by Sabrina Moody
Colcannon is a dish from Ireland that dates to at least 1735. The name “Colcannon” is derived from an Irish term, “cal ceannann” (pronounced Coal+Can+in), meaning a white-headed cabbage, or from the old Irish “cainnenin” meaning onion. Many of its ingredients were easily accessible to the poorer people and so it became a popular way to prepare potatoes. There are many regional variants of this dish, with fried cabbage being a common addition.
Colcannon was brought to America by Irish immigrants and quickly became a staple of Irish-American cuisine. The variant that we make in my family does not include cabbage, but rather kale.
Colcannon is not a usual Thanksgiving/holiday dish; however, it has become a favorite in my family and a great alternative to classic mashed potatoes.
Traditionally, it is actually a Halloween dish. It is warm, hearty, relatively inexpensive and makes an excellent substitute for classic mashed potatoes. It’s good for, really, any time of the year. It is best paired with ham or bacon, which can be added into the Colcannon itself, if desired. The best part is how flexible of a dish it is!
Ingredients:
- 6 large Irish potatoes (or similar – Russets or Yukon Golds are suggested alternatives)
- 6 Spring onions, scallions, or chives
- .25 Pint of milk or cream
- 8 oz boiled green curly kale
- 2 oz butter
- 1 tablespoon chopped parsley
- Salt and pepper to taste
- Optional cheese of choice to taste (aged Irish cheddar recommended – such as Kerry Gold’s Dubliner or Emporium Selection’s Mature Irish Cheddar)
- Optional ham or bacon to taste
- Optional any other toppings or seasonings as preferred
Time:
Approximately 40 minutes-hour (depending on what add-ins are included)
Directions:
- Boil the potatoes, peeled, until soft
- Let sit to drain thoroughly – DO NOT leave in water
- Mash the potatoes well
- Chop the spring onions/scallions/chives finely
- Add to the milk in a separate pot
- If adding salt and pepper – add to the milk
- Chop the kale finely – add into the milk
- Boil the milk mixture on low heat – stir constantly to prevent burning (NOTE: Milk burns easily, so keep careful watch on it)
- Melt half the butter and add to potatoes
- Add in the boiled milk and kale mix
- If adding cheese and or ham/bacon, cut into small pieces and mix in.
- Fold the potatoes to incorporate everything
- Beat well until the texture is light and fluffy
- Serve with the chopped parsley, remaining butter, any additional salt and pepper and any other desired toppings or seasonings, to taste ** Best served hot
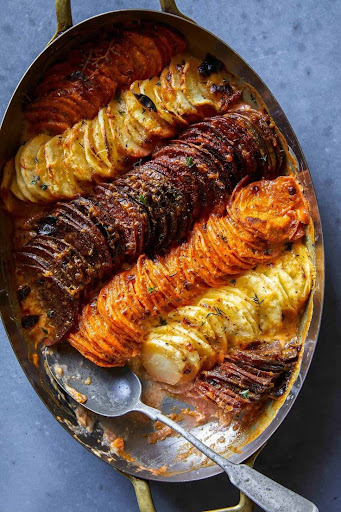
Cheesy Root Vegetable Gratin, submitted by Caillie Fish
Cheesy Root Vegetable Gratin is an annual dish at Thanksgiving for my family. My mom discovered this a few years ago and it has been a family favorite ever since. When cooked correctly it should be cheesy and gooey, not watery. Depending on how many people you are making this for you can up the amount of root vegetables that you use. The colors always pop and make the dinner table look super festive. I always look forward to this at Thanksgiving and even Christmas.
Ingredients:
Produce
- 3 Beets, small
- 1 Garlic clove
- 1 Long sweet potatoes
- 3 Parsnips, large
- 1 tbsp Thyme, fresh
Baking & Spices
- 1 Salt and pepper
Dairy
- 1 tbsp Butter, unsalted
- 1 oz Gruyere
- 14 tbsp Heavy cream
- 4 oz Parmesan, grated
Directions:
- Preheat the oven to 400. Grease a baking dish with butter.
- Slice sweet potato, parsnips and beets into very thin rounds (using a mandoline is easiest).
- Transfer each vegetable to its own bowl and add heavy cream over each sweet potato, parsnip, and beet.
- Top each bowl of sliced vegetables with some grated parmesan cheese and some minced thyme. Season each bowl generously with salt and black pepper and toss together until all vegetable slices are coated.
- Pour the rest of the heavy cream into the greased baking dish and sprinkle with parmesan and garlic.
- Grab a stack of sweet potatoes and line them standing up on their side, at the top of the casserole dish. Then do a row of parsnips and beets.
- Repeat with the remaining sweet potatoes, parsnips and beets, creating 6 rows of vegetables. Season top of gratin with salt, black pepper and remaining Parmesan.
- Cover with aluminum foil and bake until vegetables are soft (Around 40 minutes).
- Uncover gratin when done.
- Top with shredded gruyère. Place gratin back into the oven, uncovered, and continue to bake until vegetables are fork tender, cheese has melted and the top has lightly browned.
- Finish cheesy root vegetable gratin with a sprinkle of fresh thyme leaves.
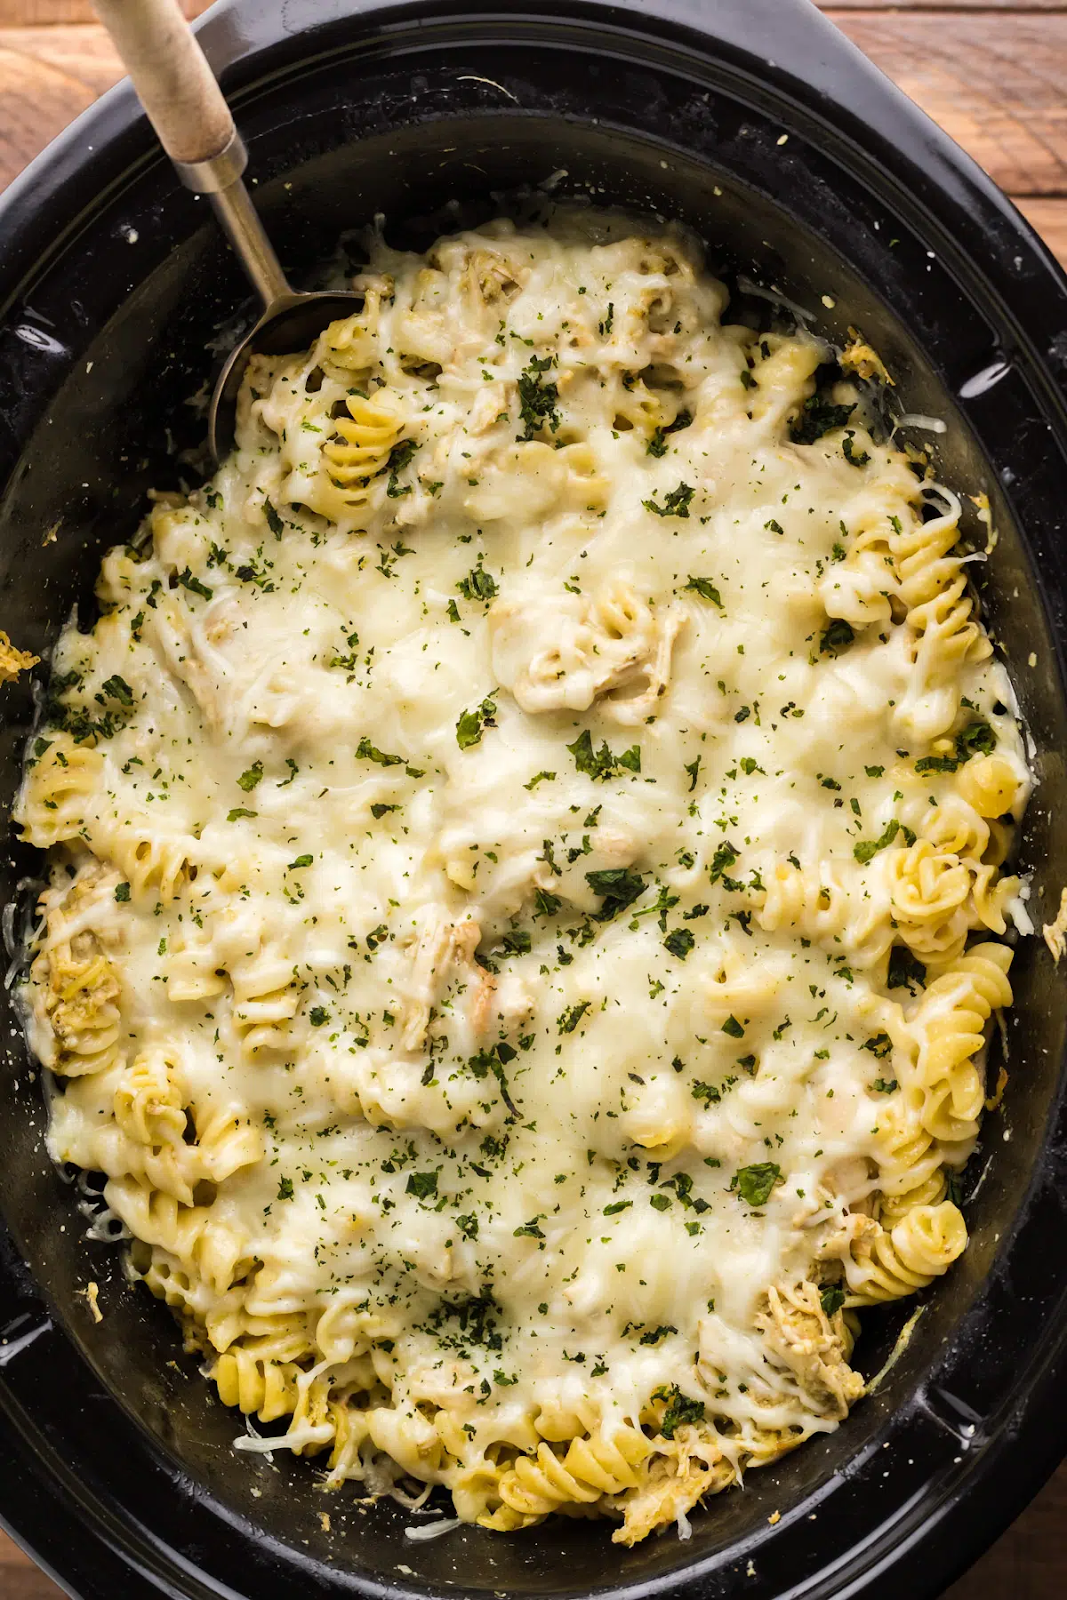
Slow Cooker Pesto Mozzarella Chicken Pasta, submitted by Fatimah Bouri
One of my favorite dishes to cook is pesto mozzarella chicken pasta. I started cooking this nearly two years ago and it’s a really tasty, cheesy dish. It may take a few hours to cook if you’re using a slow cooker but it can feed around eight to ten people. This isn’t exactly Thanksgiving-esque(?) but I always like cooking this meal during this time of year!
Ingredients:
- 3 – 4 chicken breasts
- Condiments: salt, Italian seasoning, garlic powder
- Salted butter (in slices)
- Pesto sauce
- ½ of a lemon
- Rotini (cooked al dente)
- Shredded mozzarella cheese
- Grated parmesan
- Optional: dried basil, chili pepper flakes
Time: 4 to 5 hours
Directions:
- Slice chicken breasts in half
- Season chicken with salt, Italian seasoning, and garlic powder.
- Smear pesto onto the chicken.
- Place chicken in slow cooker.
- Squeeze lemon and add butter slices on top.
- Place lid and cook on LOW for 4 and a ½ hours.
- Cook rotini/pasta and drain.
- Shred chicken with two forks and add cooked/drained pasta.
- Add parmesan cheese and stir.
- Sprinkle in lots of mozzarella.
- Place lid and cook for 15-30 more minutes.
**If you don’t have a slow cooker, you can also cook this in the oven. Just cover the chicken with foil and cook at 375°F about 20-25 minutes, add the pasta, then cook for another 5-10 minutes.
**You could also use bowtie or penne pasta instead of rotini.
**This is totally optional but because I love spice, I tend to add chili flakes at the end for some added punch!
Aunt Vicki’s Famous Pumpkin Bread, submitted by Lola Offenback
This is a family recipe that my Aunt Vicki made for many years before her sudden passing in 2019. Her original recipe came from Betty Crocker, with some tweaks made to the original recipe. This recipe is very special to my family and me. Every time we bake and eat this pumpkin bread we are honoring the legacy my aunt left. I hope some of you try it out and enjoy it too, maybe even starting a new holiday tradition in the process.
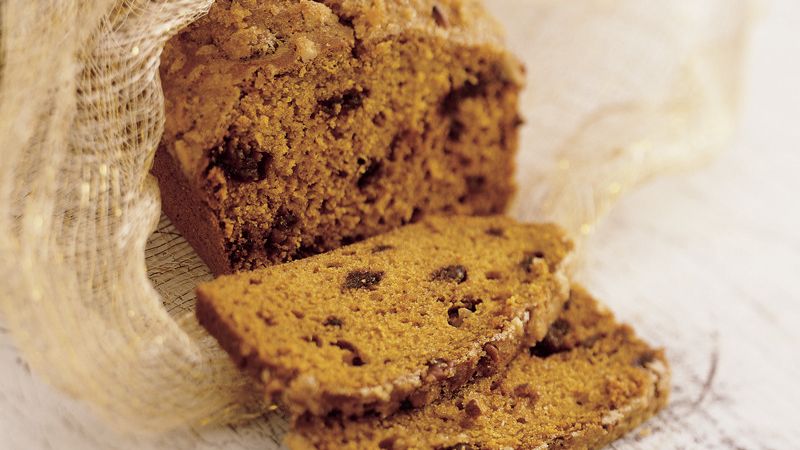
The changes my aunt made to this recipe were subtle but made a big difference. Instead of adding pecans, she added walnuts. She excluded dates from the recipe, instead adding more chopped walnuts into the batter. She also added nutmeg seasoning and excluded cloves.
Topping Ingredients:
- ⅓ cup packed brown sugar
- ⅓ cup chopped walnuts
- 1 tablespoon softened butter
Bread Batter Ingredients:
- 1 ⅔ cups granulated sugar
- ⅔ cup vegetable oil
- 2 teaspoons vanilla extract (pumpkin pie extract also works well!)
- 4 eggs
- 1 can (15 oz) pumpkin puree
- 3 cups all-purpose flour
- 2 teaspoons baking soda
- ½ teaspoon baking powder
- 1 teaspoon cinnamon
- 1 teaspoon nutmeg
- ¾ teaspoon salt
- ½ teaspoon baking powder
- Additional chopped walnuts to preference
Directions:
- Move the oven rack to a low position so that the tops of the pans are in the center of the oven.
- Preheat oven to 375℉.
- Grease the bottom and sides of two loaf pans.
- Mix the topping ingredients together and set aside.
- In a large mixing bowl, combine the granulated sugar, oil, vanilla, eggs, and pumpkin puree. Then stir in the chopped walnuts. Pour the batter into pans and sprinkle topping on top of the batter.
- Bake for 50-60 minutes for 8-inch loaves, 1 hour and 10-20 minutes for 9-inch, or until a toothpick inserted comes out clean.
- Cool for 10 minutes, remove from pans, and allow to cool completely (about 1 hour) before slicing.
Wegmans, submitted by Joel Hendricks
Give Wegmans some money, and they’ll cook your meal for you! 🙂
Strawberry Angel Food Cake Roll, submitted by Liz Kameen
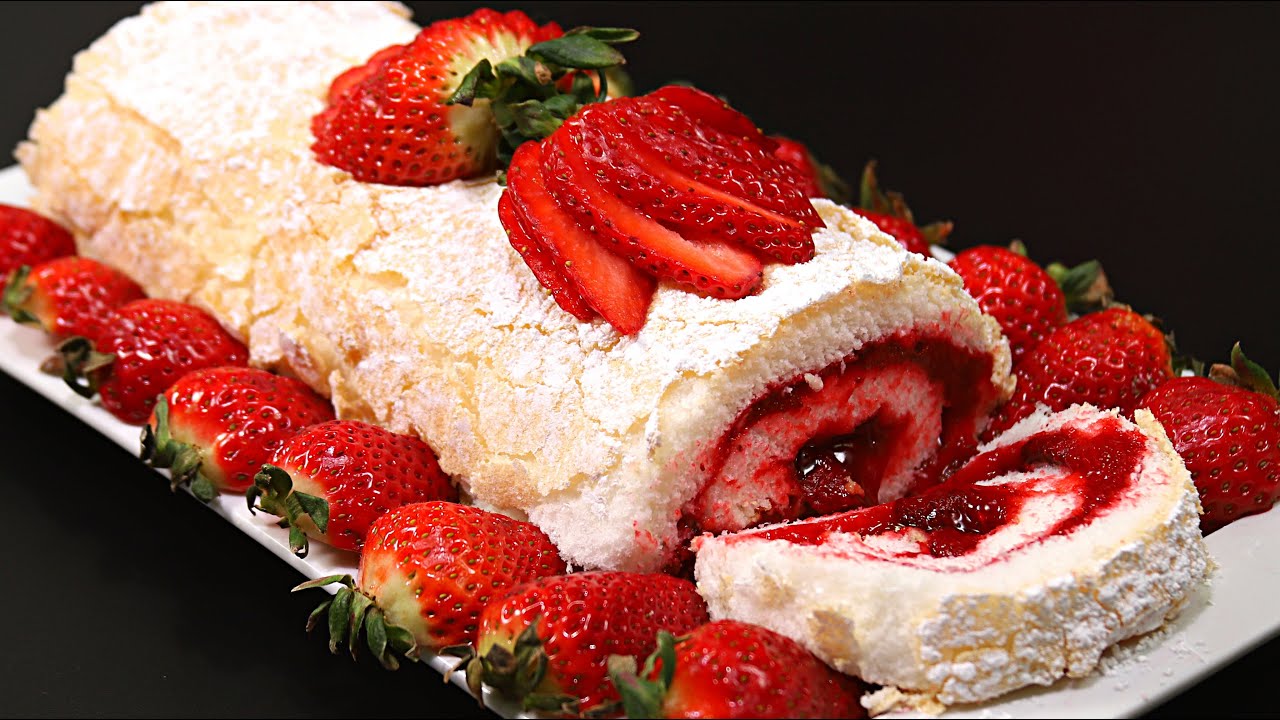
Ingredients:
1 Angel food cake box mix (the type with two envelopes per box is the best)
1 large box strawberry jello
2 cups boiling water
1 box frozen sweetened strawberries
1 cup approximately of baked Angel food cake torn into pieces (cut a thin slice of cake off each end of the baked cake roll, tear into pieces and mix in with the dissolved jello/frozen strawberry combination)
1 cup fresh strawberries for garnish thinly sliced
1 small container of un-whipped heavy cream
1 tablespoon sugar
1 teaspoon vanilla
1 container thawed cool whip
Directions for cake:
For cake, follow the box directions.
- Place the completed cake mixture into a clean, un-greased jelly roll pan (looks like a cookie tray pan with one inch high walls).
- Bake according to box directions.
- When done, take a knife and run along the cake pan edges to loosen the cake from the pan.
- Using potholders, immediately flip the pan and place the baked cake onto a clean kitchen towel or clean cheesecloth. Immediately roll and set aside. If you don’t immediately do this, the cake will crack if you try to roll it while it is cool.
Filling:
- Add 2 cups of boiling water to the contents of one large box of strawberry jelly.
- Stir until dissolved.
- Add one box of frozen sweetened strawberries and stir using two forks to break apart the frozen strawberries for even distribution in the mixture.
- Cut a thin slice of baked Angel food cake from each end of the baked Angel food cake.
- Tear the two thin cake slices into small pieces and add those pieces to the jello/frozen strawberry mixture.
- Place mixture in the refrigerator for at least 20 minutes until thickened enough to spread into the baked Angel food cake roll.
- After the filling has been added to inside the Angel food cake roll, wrap the rolled cake containing the filling in Saran Wrap or Press and Seal Wrap and place in refrigerator until the cake with filling is solid.
For cake topping:
- Take 1 small container of heavy whipping cream and pour it into a stainless steel mixing bowl.
- Add one tablespoon sugar and one teaspoon of vanilla extract.
- Start on slow speed and work up to full speed until the cream holds its shape. Be careful not to over-whip it, or it will turn into butter.
- Take a container of thawed cool whip and hand fold it into the whipped cream mixture. This will help the topping hold its shape longer.
- Put the whipped cream mixture into a piping bag with a large fancy decorative tip of your liking.
- Pipe whipped cream topping in long lines to cover the cake. If you do not have a piping bag, you can spread the whipped cream onto the cake using a spatula or knife.
- For garnish, remove strawberry stems and then thinly slice one cup of strawberries.
- Stand the thin strawberry slices upright into the cake, topping one after another in decorative rolls.
Enjoy!